
Only follow these instructions if you encountered errors using the Preferred Settings or choose not to use them. If you have downloaded one of the three Preferred Setting files, skip this section and go to Start Streaming in HD using the Encoder to test out your settings.
Below are our recommended settings. Some of these options may not be available on your computer, or may not work with your setup. If you are comfortable doing so, you can change these values to the best settings for your equipment. If you are not comfortable changing these settings, use the Preferred Settings instead, or contact our support team for more help.
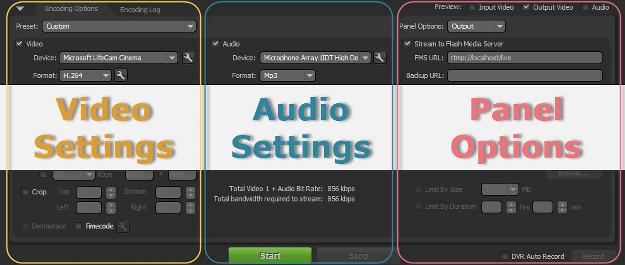
When you open the encoder, you’ll see that it has three sections: Video settings, Audio settings, and Panel options (see image on the right). Follow the instructions below to set up each section.
Make sure to follow the correct settings depending on the type of computer you’re using.
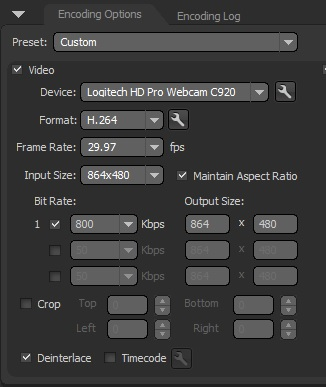
Follow these steps to configure your video settings.
- On the left side, select “Custom” in the Preset select box.
- Check the Video box.
- Under Device, select your webcam.
- Set Format to “H.264”- Next to Format, click the wrench icon to get to the Advanced Encoder Settings.
– Set Profile to “Baseline.”
– Set Level to “3.1.”
– Set Keyframe Frequency to “1 second.” - Set Frame Rate to “29.97” fps.
- Set Input Size to “864×480” or closest match.
- Check the Maintain Aspect Ratio box.
- Set Bit Rate to “800” kbps.
- Set Output Size to match Input Size in step
- Check the Deinterlace box at the bottom.
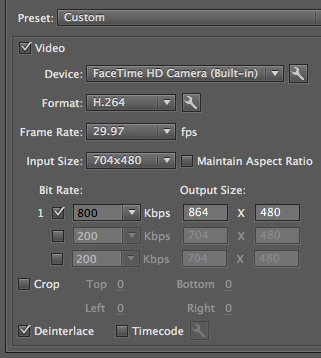
Follow these steps to configure your video settings.
- On the left side, select “Custom” in the Preset select box.
- Check the Video box.
- Under Device, select your webcam.
- Set Format to “H.264”- Next to Format, click the icon to get to the Advanced Encoder Settings.
– Set Profile to “Baseline.”
– Set Level to “3.1.”
– Set Keyframe Frequency to “1 second.” - Set Frame Rate to “29.97” fps.
- Set Input Size to “704×480.”
- Uncheck the Maintain Aspect Ratio box.
- Set Bit Rate to “800” kbps.
- Set Output Size to “864×480.”
- Check the Deinterlace box at the bottom.
Follow these steps to configure your audio settings.
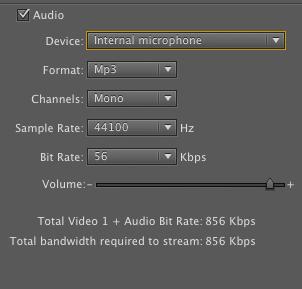
- Check the Audio box.
- Under Device, select your microphone.
- Set Format to “Mp3.”
- Set Channels to “Mono.”
- Set Sample Rate to “44100” Hz.
- Set Bit Rate to “56” Kbps.
Follow these steps to configure your panel settings.
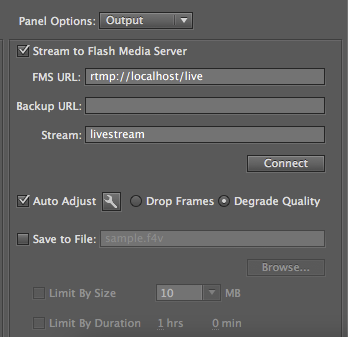
- Next to preview, check the Output Video and Audio boxes. Input Video box should be unchecked.
- Next to Panel Options, select “Output.”
- Make sure Stream to Flash Media Server is checked.
- Delete all text in the FMS URL, Backup URL and Stream fields.
- Check the Auto Adjust box.
- Select the Degrade Quality option.
- Next to Auto Adjust, click on the wrench icon.- Set Maximum Buffer Size to “5.”
– Set Minimum Video Bitrate to “100.” - Make sure Save to File is unchecked.
Save your settings so you don’t have to configure the encoder again. You can save multiple configurations.
Click on “File” > “Save Profile.”
Choose a name for your settings file, “Streamate” for example.
Whenever you open the Adobe Encoder, click on “File” > “Open Profile” and select the settings you want to use.
Your encoder is now configured manually! Read on to Start Streaming in HD using the Encoder.
